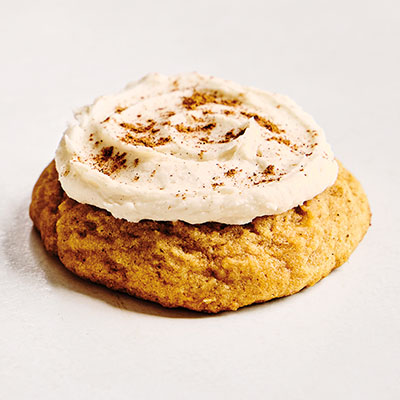
Sweet Potato Cookies with RumChata Frosting
A twist on the pumpkin spice craze, here sweet potato adds an earthy sweetness to these lightly spiced, soft and cakey cookies. Topping them with decadent RumChata Frosting makes sure that no one will be able to resist a second cookie. Enjoy this cookie with Rumchata Cream Liqueur.Ingredients
Serves 30 cookies
SWEET POTATO COOKIES
1 large sweet potato, peeled and roughly chopped
2 cups (500 ml) all-purpose flour
1 tsp (5 ml) baking soda
½ tsp (2.5 ml) baking powder
½ tsp (2.5 ml) fine sea salt
1 tsp (5 ml) ground cinnamon, plus more for garnish
½ tsp (2.5 ml) ground nutmeg
½ tsp (2.5 ml) ground ginger
⅛ tsp (a pinch) ground cloves
10 tbsp (150 ml) unsalted butter, room temperature
¾ cup (180 ml) granulated sugar
½ cup (125 ml) packed light brown sugar
1 large egg
1 tsp (5 ml) vanilla extract
RUMCHATA FROSTING
1 cup (250 ml) unsalted butter, room temperature
4 cups (1 L) icing sugar, divided
1 tsp (5 ml) vanilla extract
¼ tsp (1 ml) ground cinnamon
¼ tsp (1 ml) fine sea salt
⅓ cup (80 ml) RumChata Cream Liqueur
Instructions
- To make the cookies, bring a saucepan of water to a boil over high heat. Add sweet potatoes and cook until fork-tender, about 10 minutes. Drain and transfer to a bowl. Use a fork to mash warm sweet potatoes until smooth, with few to no lumps. Set aside 1 cup (250 ml) mashed sweet potatoes and reserve rest for another use.
- Preheat oven to 350 F (175 C). Line 2 baking sheets with parchment and set aside.
- In a medium mixing bowl, whisk flour, baking soda, baking powder, salt, cinnamon, nutmeg, ginger and cloves until well combined. Set aside.
- In bowl of a stand mixer fitted with paddle attachment, cream butter and sugars until well combined. Stir in egg, then add reserved sweet potatoes and vanilla, mixing until well combined. Scrape down sides of bowl with a rubber spatula as needed. Add flour mixture and mix until just combined.
- Using a 1½ tbsp (22.5 ml) cookie scoop, scoop cookie dough onto prepared baking sheets, spacing them 2-in (5 cm) apart.
- Bake 1 tray at a time until cookies are puffed and set, 13 to 15 minutes. Cool on baking sheet for several minutes, then transfer to a rack to cool completely.
- To make the RumChata Frosting, in a large bowl, combine butter, 2 cups (500 ml) icing sugar, vanilla, cinnamon, salt and RumChata. Using a hand mixer, beat until smooth. Add remaining 2 cups (500 ml) icing sugar and beat until light and fluffy. Frosting can be stored in an airtight container in refrigerator for up to 4 days. Bring to room temperature and rewhip before using.
- Once cool, spread a dollop of RumChata Frosting on cookies. Serve right away or store in an airtight container in a single layer in refrigerator for up to 2 days. Bring to room temperature before serving.
Drink Pairings
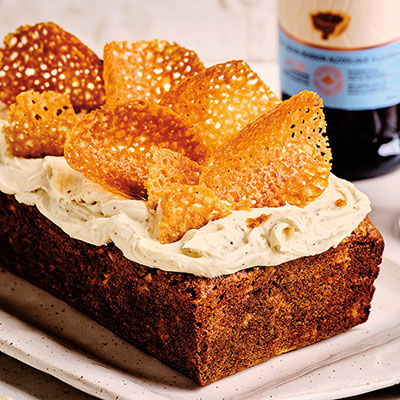
Parsnip Loaf Cake with Brown Butter Cream Cheese Frosting & Brandy Snaps
This showstopping loaf cake showcases the sweeter side of the humble parsnip. Widely available during cooler months, parsnips have a nutty, earthy, starchy and naturally sweet flavour. Complemented by big swoops of decadent Brown Butter Cream Cheese Frosting and crisp Brandy Snaps, this cake can easily stand alongside more elaborate fall treats. Serve this Parsnip Loaf Cake with Forty Creek Butter Tart Cream Liquor.Ingredients
Serves 10
PARSNIP LOAF
1 cup (250 ml) cake flour
¾ cup (180 ml) all-purpose flour
⅓ cup (80 ml) almond flour
1½ tsp (7.5 ml) ground ginger
1½ tsp (7.5 ml) ground cinnamon
¼ tsp (1 ml) ground allspice
½ tsp (2.5 ml) ground cardamom
1 tsp (5 ml) baking soda
½ tsp (2.5 ml) baking powder
½ cup (125 ml) unsalted butter, room temperature
½ cup (125 ml) packed light brown sugar
½ cup (125 ml) granulated sugar
½ tsp (2.5 ml) finely grated orange zest
2 large eggs, room temperature
2½ tsp (12.5 ml) vanilla extract
⅓ cup (80 ml) plain Greek yogurt
1½ cups (375 ml) peeled and shredded parsnips (2 to 3 medium parsnips)
BROWN BUTTER CREAM CHEESE FROSTING
6 tbsp (90 ml) unsalted butter
4 oz (110 g) cream cheese, room temperature
2 tsp (10 ml) liquid clover honey
1 tsp (5 ml) vanilla extract
½ tsp (2.5 ml) kosher salt
1½ cups (375 ml) icing sugar, sifted, plus more as needed
1 to 2 tbsp (15 to 30 ml) whipping cream, as needed
BRANDY SNAPS
½ cup (125 ml) unsalted butter
½ cup (125 ml) liquid clover honey
¼ cup (60 ml) firmly packed light brown sugar
¼ cup (60 ml) granulated sugar
¾ cup (180 ml) all-purpose flour
⅛ tsp (a pinch) fine sea salt
¼ tsp (1 ml) ground ginger
1 tbsp (15 ml) St. Rémy VSOP Brandy
Instructions
- To make the parsnip loaf, Preheat oven to 350 F (175 C). Line a 5 × 9-in (2 L) loaf pan with parchment, leaving an overhang on all sides.
- In a medium bowl, whisk all flours, ginger, cinnamon, allspice, cardamom, baking soda and baking powder. Set aside.
- In a stand mixer fitted with whisk attachment, whisk butter, both sugars and orange zest on medium speed, scraping down sides of bowl as needed, until well combined and fluffy, 2 to 3 minutes. Add eggs 1 at a time, whisking well after each. Add vanilla, whisking well to incorporate. Alternate adding dry ingredients in 3 additions and yogurt in 2 additions, whisking slowly after each addition until just combined before adding next. A few flour streaks are okay. Remove bowl from mixer and use a rubber spatula to fold in shredded parsnips.
- Scoop half of batter into prepared loaf pan. Evenly smooth into corners. Scoop remaining batter into pan and smooth into an even layer.
- Bake loaf until risen and golden brown, 55 minutes to 1 hour. A wooden skewer inserted into centre of cake should come out clean or with only a few moist crumbs. Cool cake in pan on a rack for 20 minutes. Carefully remove cake from pan with help from excess parchment before removing parchment from cake. Continue cooling cake on rack to room temperature.
- When ready to serve, dollop and spread Brown Butter Cream Cheese Frosting overtop cake and garnish with some Brandy Snaps. Slice and serve with extra Brandy Snaps on side.
- BROWN BUTTER CREAM CHEESE FROSTING
- Start by making brown butter. In a small frying pan over medium heat, melt butter. Once butter starts to foam, whisk continuously until brown bits start to form. Remove from heat, pour browned butter into a bowl, skim and discard any foam from top and cool to room temperature, stirring occasionally.
- To make frosting, in bowl of a stand mixer fitted with paddle attachment, cream ¼ cup (60 ml) room-temperature brown butter, cream cheese, honey, vanilla and salt until creamy and well combined, about 2 minutes. Scrape down sides of bowl as needed. Add sifted icing sugar ½ cup (125 ml) at a time, beating well after each addition and scraping down sides of mixing bowl as needed. Beat on high until frosting is fluffy and holds a peak. If frosting is too thick, add 1 to 2 tbsp (15 to 30 ml) whipping cream, beating until well incorporated. If frosting is too thin, beat in more icing sugar, a couple of tablespoons at a time, until desired texture is achieved. Frosting can be made ahead and stored in an airtight container in refrigerator for up to 1 week. Bring frosting back to room temperature and whip to revive before frosting cake.
- BRANDY SNAPS
- Preheat oven to 325 F (160 C). Line a baking sheet with a baking mat or parchment.
- In a small saucepan over medium heat, melt butter with honey and sugars, stirring constantly with a wooden spoon. Once at a rolling simmer, allow mixture to bubble and cook for 1 minute. Remove saucepan from heat and stir in flour, salt, ginger and brandy until just combined. At this point, batter can be stored in an airtight container in refrigerator until ready to bake, up to 4 days.
- Using a measuring teaspoon, drop rounds of batter onto prepared baking sheet. Only do 6 to 8 dollops of batter, as cookies will spread out significantly in oven.
- Bake until bubbling, lacy and golden brown, 10 to 13 minutes. Remove baking sheet from oven and allow brandy snaps to cool on sheet for about 2 minutes. Gently lift snaps 1 at a time and drape them over a rolling pin. Once cool, remove brandy snaps from rolling pin and repeat with remaining batter. These are best enjoyed within a day of making.
Drink Pairings
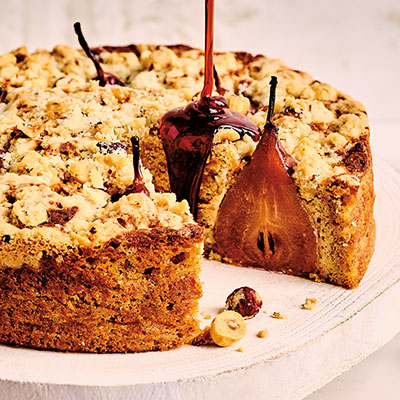
Carrot Hazelnut Crumb Cake with Red Wine Poached Pears
This showstopping carrot cake is moreish and comforting, no icing required. While great on their own, the Red Wine Poached Pears add extra texture to this cake. Also, baking them right into the cake keeps the cake moist and fresh for up to 5 days, making this a great make-ahead dessert. Serve this cake with Carolans Irish Cream Liqueur or Inniskillin Okanagan Pinot Noir.Ingredients
Serves 6 poached pears
⅔ cup + ¼ cup (220 ml) unsalted butter, room temperature, divided
1¼ cups (310 ml) granulated sugar, divided
1⅔ cups (410 ml) all-purpose flour, divided
1 cup (250 ml) shredded carrots (about 2 medium carrots)
2 tsp (10 ml) baking powder
½ tsp (2.5 ml) freshly grated nutmeg
1 tsp (5 ml) ground cardamom
1 tsp (5 ml) ground cinnamon
½ tsp (2.5 ml) kosher salt
3 large eggs, room temperature
½ cup (125 ml) hazelnut flour
½ cup (125 ml) sour cream
¼ cup (60 ml) whole milk
6 Red Wine Poached Pears, room temperature, make ahead, recipe follows
⅓ cup (80 ml) roughly chopped hazelnuts
RED WINE POACHED PEARS
2 cups (500 ml) water
2 cups (500 ml) Inniskillin Okanagan Estate Pinot Noir
1 cup (250 ml) granulated sugar
1 vanilla bean, split in half and seeds scraped out
6 small firm Bosc pears or Forelle pears, peeled but not cored
Instructions
- Preheat oven to 350 F (175 C). Lightly grease base and sides of a 9-in (23 cm) springform pan and line with parchment. Set aside.
- In bowl of a stand mixer fitted with paddle attachment, beat ⅔ cup (160 ml) butter and 1 cup (250 ml) sugar at medium-high speed, scraping down sides of bowl as needed, until mixture is very pale and creamy, about 3 minutes.
- In a medium bowl, whisk 1⅓ cups (330 ml) flour, shredded carrots, baking powder, nutmeg, cardamom, cinnamon and salt until well combined.
- Add 2 tbsp (30 ml) flour mixture to butter mixture and beat until combined. Add eggs 1 at a time, beating well after each. Add remaining flour mixture, hazelnut flour, sour cream and milk. Mix until just combined. Spoon batter into prepared springform pan and smooth out into 1 even layer. Press pears into batter so they are arranged evenly and are standing upright.
- Make a quick hazelnut crumb by placing chopped hazelnuts and remaining ¼ cup (60 ml) butter, ¼ cup (60 ml) sugar and ⅓ cup (80 ml) flour in a medium bowl. Using your hands, rub ingredients together until a coarse crumb forms. Sprinkle crumble over cake, in and around pears.
- Bake until golden brown and a wooden skewer inserted in centre of cake comes out clean, 60 to 75 minutes. If crumble is browning too quickly, loosely cover with foil and continue to bake until cake is done. Cool cake in pan on a rack for 20 minutes, then remove springform collar and parchment (leave base on) and let cool to room temperature on rack.
- To serve, transfer cake to a cake plate or cutting board. Cut and serve. Serve reduced pear poaching liquid alongside to drizzle over cake, if desired.
- RED WINE POACHED PEARS
- In a small saucepan, stir water, wine, sugar and vanilla bean. Warm mixture over medium heat, stirring constantly, until sugar dissolves, about 2 minutes. Bring mixture just to a simmer.
- Place pears in simmering sugar syrup. To keep pears submerged, place a piece of parchment over them so that it touches poaching liquid. Poaching time for pears will depend on their ripeness. To check pears for doneness, after 8 to 10 minutes, lift them gently from syrup with a slotted spoon and, using a small knife, poke flesh. Pears are done when knife meets little resistance. If not yet done, return pears to sugar syrup and check every 3 to 5 minutes. When cooked to desired doneness, transfer pears to a bowl or plate, trying to keep them standing upright (slicing off a bit of each pear’s bottom helps with this). Let cool completely to room temperature before using.
- If desired, to make a syrup, return poaching liquid to stovetop over high heat and boil until reduced by half and syrupy, about 5 minutes. Set aside until needed.
Drink Pairings
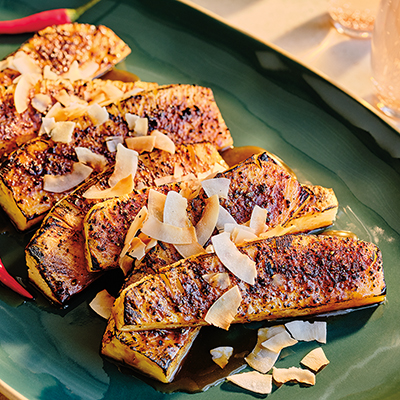
Brown Sugar & Cardamom-Rubbed Pineapple with Tamarind Rum Caramel
This sweet and savoury grilled pineapple dish is happy to share the plate with a smoky, grilled BBQ dinner as it is with a scoop of vanilla ice cream. Villa Teresa Prosecco Rosé makes a great pairing with this grilled pineapple recipe.Ingredients
Serves 4-6
¾ tsp (4 ml) cardamom seeds
½ tsp (2.5 ml) black peppercorns
2 tbsp (30 ml) brown sugar
½ tsp (2.5 ml) ground cinnamon
⅛ tsp (a pinch) ground nutmeg
⅛ tsp (a pinch) salt
1 pineapple, peeled and cut into 5-in (12.5 cm) long wedges
Tamarind-Rum Caramel, make ahead, recipe follows
Toasted coconut shavings, for garnish
flaked sea salt, for garnish
TAMARIND RUM CARAMEL (Makes about ¾ cup (180 ml))
1 cup (250 ml) granulated sugar
½ cup (125 ml) water
⅓ cup (80 ml) coconut milk
⅓ cup (80 ml) Captain Morgan Spiced Rum
2 tbsp (30 ml) seedless tamarind pulp or 1 tbsp (15 ml) tamarind paste
1½ tbsp (22.5 ml) light soy sauce
½ Thai (bird’s eye) chili, sliced lengthwise
Instructions
- In a small pan over medium-low heat, combine cardamom seeds and peppercorns and toast until fragrant, 3 to 4 minutes. Transfer to a mortar and pestle and grind to medium-fine consistency. Mix with brown sugar, cinnamon, nutmeg and salt.
- Gently rub spice mixture into pineapple wedges and let sit for 15 to 20 minutes.
- Preheat barbecue grill to medium-high.
- Grill pineapple about 2 minutes per side, until lightly caramelized, then transfer to a serving dish. Drizzle with Tamarind-Rum Caramel and garnish with toasted coconut shavings and flaked sea salt.
- Serve as a sweet side dish or savoury dessert; this is as happy with grilled prawns and chicken as with vanilla ice cream.
- TAMARIND RUM CARAMEL (Makes about ¾ cup (180 ml))
- In a medium saucepan, whisk sugar and water until combined. Cook over medium-high heat, without stirring, until sugar caramelizes and becomes a medium amber colour.
- Lower heat and carefully add coconut milk, making sure to keep hands clear from splatters. Whisk until smooth, then add rum, tamarind, soy sauce and chilies, breaking up any large pieces of tamarind.
- Remove from heat and steep 10 minutes, then strain, pressing gently with a spatula. Can be stored in an airtight container in refrigerator for up to 1 week.
Drink Pairings
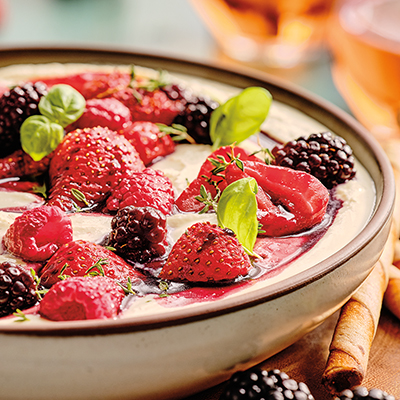
Whipped Feta with Red-Wine Grilled Mixed Berries
This fun, dippable whipped feta red-wine dessert is a great choice when wanting to serve something to linger over at the end of a meal. Serve with an array of fruit, cookies or grilled brioche, allowing diners to choose their own sweet adventure. Pair with Dirty Laundry Hush Rosé.Ingredients
Serves 4
10 oz (280 g) feta, crumbled
⅓ cup (80 ml) plain Greek yogurt
1 tbsp (15 ml) extra-virgin olive oil
4 tbsp (60 ml) liquid clover honey, divided
½ tsp (2.5 ml) ground cardamom
1 lb (450 g) mixed red berries (such as strawberries, raspberries, blackberries or cherries), halved if large
3 tbsp (45 ml) See Ya Later Ranch Poppy Red
fresh thyme leaves, mint leaves and/or basil leaves, for garnish
selection of fruit, cookies or grilled brioche, to serve
Instructions
- Preheat barbecue grill to medium-high.
- Meanwhile, make whipped feta. In bowl of a food processor fitted with an S blade, combine feta, yogurt, olive oil, 2 tbsp (30 ml) honey and cardamom. Blend until smooth and creamy, scraping down sides of bowl with a rubber spatula as needed. Transfer to a bowl and refrigerate until ready to serve.
- In a medium bowl, gently toss mixed berries, red wine and remaining 2 tbsp
- (30 ml) honey. Stack 2 layers of heavy-duty foil on top of each other and fold up sides slightly. Add berry mixture and bring up edges to create an open parcel. Alternatively, you could use an ovenproof frying pan. Place over flames, reduce heat to medium and grill for 10 to 15 minutes, taking care to stir every few minutes. Berries should be softened and starting to release their juices. If not, continue to grill for another 5 to 10 minutes.
- To assemble, spread whipped feta onto a dinner plate or into a shallow bowl. Spoon warm berries over whipped feta. Garnish with a drizzle of berry juices and a sprinkling of herbs. Serve alongside fruit, cookies or brioche for dipping.
Drink Pairings
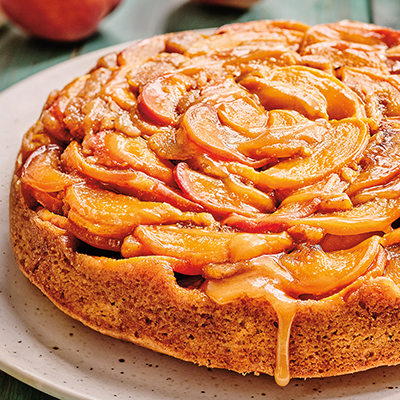
Okanagan Peach Bourbon Upside-Down Barbecue Cake
While grilling this season, why not try baking on the barbecue? This cake is cooked on the grill in a cast iron skillet. If you would rather bake inside, simply cook the caramel on the stovetop over medium heat and bake the cake in a 350 F (175 C) oven for 35 to 40 minutes. This cake is also delicious using nectarines or plums in place of peaches. Pair this recipe with No Boats on Sunday BC Cider.Ingredients
Serves 8 to 10
¾ cup (180 ml) unsalted butter, divided
⅓ cup (80 ml) lightly packed light brown sugar
3 tbsp (45 ml) Maker’s Mark Kentucky Straight Bourbon Whisky
½ cup + 2 tbsp (155 ml) granulated sugar
3 large eggs
1 tsp (5 ml) vanilla extract
1 tsp (5 ml) ground cinnamon
½ tsp (2.5 ml) kosher salt
¼ cup (60 ml) finely ground pecans
1½ cups (375 ml) all-purpose flour
½ tsp (2.5 ml) baking powder
3 to 4 peaches, pitted and sliced into thin half-moons
Instructions
- With lid closed, preheat 1 side of barbecue grill so temperature registers 350 F (175 C).
- Place an 8- or 9-in (20 or 23 cm) cast iron skillet over flame. Add ¼ cup (60 ml) butter, brown sugar and bourbon and stir with a wooden spoon until butter has melted and mixture is bubbling, about 4 minutes. Remove skillet from heat and set aside while making cake batter.
- In a medium saucepan, melt remaining
- ½ cup (125 ml) butter over grill. Remove and stir in granulated sugar, eggs, vanilla, cinnamon, salt and ground pecans until well combined. Sift flour and baking powder overtop, then fold in with a rubber spatula until just combined.
- Artfully arrange peach slices over caramel in skillet, starting from centre and layering peaches in a spiral, making sure to fill in any gaps. Spoon batter over peaches and spread out evenly with a rubber spatula or back of a spoon.
- With barbecue still at 350 F (175 C), place skillet on grill over indirect heat (away from ignited burner), close lid and bake cake for 40 to 50 minutes, rotating skillet halfway through cooking time. Cake should look golden and a wooden skewer inserted in centre should come out clean.
- Remove skillet from grill, place on a rack and cool for 10 minutes. Run a knife around edge of skillet to loosen cake before inverting onto a serving plate. Serve warm or at room temperature.
Drink Pairings

Limoncello Blueberry Tiramisu with Candied Rosemary
Once summer arrives, the desire to spend time in the kitchen tends to wane and we look for fresh recipes that can be whipped up in a jiffy. This limoncello blueberry tiramisu is perfect for such an occasion. With just a few ingredients, you will have a dessert with next to no effort yet packed with flavour. Feel free to shake things up by replacing the blueberries with strawberries, raspberries or blackberries, or even the ladyfingers with amaretti cookies. The Candied Rosemary is optional but takes this dessert from simply delicious to stunning. This dessert pairs beautifully with Steller's Jay Brut.Ingredients
Serves 4
13 oz (370 g) fresh blueberries, plus more for garnish
½ cup + 2 tbsp (155 ml) icing sugar, divided
3 tbsp (45 ml) fresh lemon juice, divided
1 tbsp (15 ml) finely grated lemon zest
¼ cup (60 ml) granulated sugar
¼ cup + 2 tbsp (90 ml) Luxardo Limoncello, divided
⅔ cup (160 ml) whipping cream
1 tbsp (15 ml) powdered milk (optional)
⅓ lb (150 g) mascarpone
4 ladyfingers, each cut in half
Candied Rosemary leaves, for garnish, make ahead, recipe follows
Instructions
- Start by making a blueberry coulis. In a small saucepan, stir blueberries, ½ cup (125 ml) icing sugar and 1 tbsp (15 ml) lemon juice. Set over medium heat and bring to a simmer, stirring often. Simmer until blueberries have broken down and mixture is glossy, about 5 minutes. Transfer blueberry coulis to a bowl and refrigerate, stirring occasionally, until cool. Blueberry coulis can be made up to 2 days ahead.
- In a small saucepan, stir remaining 2 tbsp (30 ml) lemon juice, lemon zest and granulated sugar. Set saucepan over medium heat and warm mixture, stirring constantly, until sugar has dissolved. Remove saucepan from heat and stir in ¼ cup (60 ml) limoncello. Transfer lemon syrup to a medium bowl and set aside to cool to room temperature. Lemon syrup can be made ahead and kept in an airtight container in refrigerator for up to 3 days.
- In a medium bowl, whisk whipping cream and powdered milk (if using) until stiff peaks form. Set aside.
- In bowl of a stand mixer fitted with whisk attachment, combine mascarpone, remaining 2 tbsp (30 ml) icing sugar and remaining 2 tbsp (30 ml) limoncello. Whisk on medium speed until well combined and slightly aerated, about 2 minutes. Fold in whipped cream with a rubber spatula until incorporated completely.
- To assemble, place a generous spoonful of blueberry coulis in bottom of each of 4 serving glasses. Top with a good dollop of lemon mascarpone cream before dipping half the ladyfingers in lemon syrup and placing on top of cream. Repeat, creating another layer with more blueberry coulis, mascarpone cream and syrup-dipped ladyfingers. Garnish with another dollop of mascarpone cream, a drizzle of coulis, some fresh blueberries and Candied Rosemary leaves.
Drink Pairings
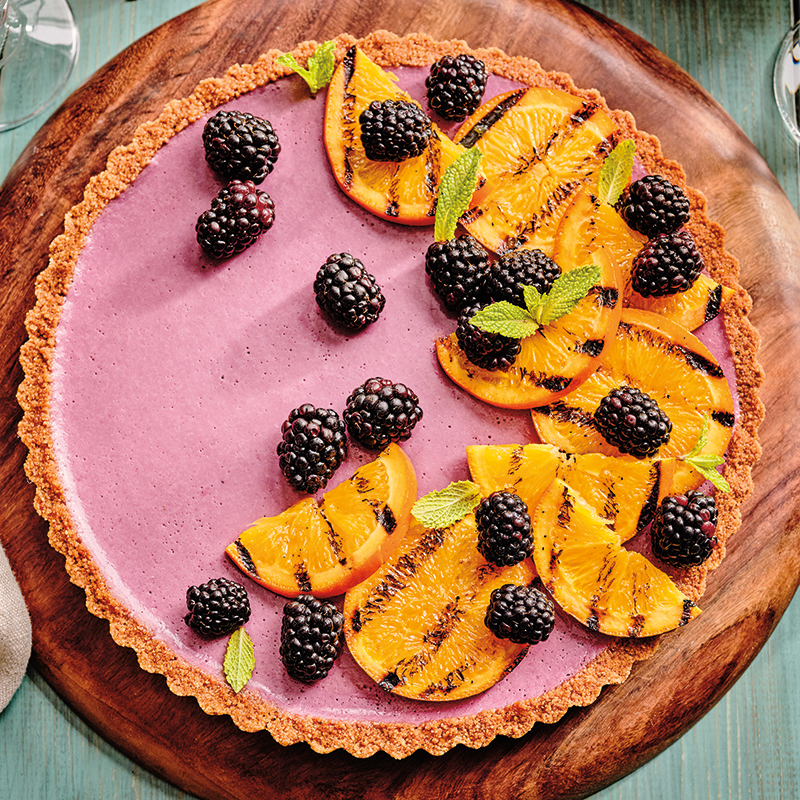
Blackberry Tart with Grilled Grand Marnier Oranges
This brilliantly coloured blackberry tart with Grand Marnier oranges makes the perfect finale to any summertime meal. You can swap out the blackberries for raspberries for an equally delicious result. Try pairing this recipe with Saintly The Good Sparkling Rosé.Ingredients
Serves 10
1 cup (250 ml) unsalted butter, divided
2 cups (500 ml) gingersnap cookie crumbs
¼ tsp (1 ml) fine salt
¼ cup (60 ml) water, room temperature
2½ tsp (12.5 ml) powdered gelatin
3 cups (750 ml) blackberries, plus more for garnish
¾ cup (180 ml) whole milk
½ cup (125 ml) granulated sugar
½ cup (125 ml) whipping cream
1 tsp (5 ml) vanilla extract
¼ cup (60 ml) light brown sugar
2 tbsp (30 ml) Grand Marnier Cordon Rouge
2 navel oranges, ends trimmed off and each cut into 8 rounds
Instructions
- Preheat oven to 350 F (175 C).
- In a small saucepan over medium heat, melt ½ cup (125 ml) butter. Cook, stirring occasionally, until butter stops foaming and solids start to turn golden brown, 8 to 10 minutes. Transfer butter to a medium bowl and set aside to cool slightly.
- In a medium bowl, stir gingersnap cookie crumbs, salt and ⅓ cup (80 ml) browned, melted butter until well combined and mixture sticks together in a clump when pressed between fingers. Press crust mixture into a 9-in (23 cm) fluted tart pan, pressing mixture evenly into bottom and up sides. Refrigerate tart shell for 10 minutes. Save any remaining browned butter for another use; it will keep in an airtight container in refrigerator for up to 2 weeks.
- Place chilled tart shell on a rimmed baking sheet and bake until firm, 12 to 14 minutes. Set aside on a rack to cool completely at room temperature.
- To make blackberry filling, start by placing water in a small bowl and sprinkling gelatin evenly overtop. Let bloom for 5 minutes.
- Meanwhile, place blackberries in bowl of a food processor fitted with an S blade. Blend until blackberries are well puréed. Strain mixture through a fine-mesh strainer into a bowl and discard seeds. You should have about 1 cup (250 ml) purée.
- In a medium saucepan over medium heat, bring milk and sugar to a simmer, stirring often. Remove from heat and stir in bloomed gelatin until it melts. Transfer warm milk mixture to a blender along with blackberry purée, whipping cream and vanilla. Blend on low until well combined. Transfer mixture to a container with a pour spout. Carefully pour blackberry mixture into crust, filling it to top. Transfer tart to refrigerator until custard is set, at least 1 hour.
- Preheat barbecue grill to medium, taking care to clean and oil grills.
- In a small saucepan, combine remaining ½ cup (125 ml) butter, brown sugar and Grand Marnier. Warm gently over medium heat, whisking constantly, until butter melts and sugar dissolves. Remove from heat.
- Place orange slices on grill and baste with butter mixture. Grill until grill marks form on underside, about 1 minute, then flip and baste again. Continue to grill until warm but not falling apart. Transfer to a platter and baste one last time. Let cool for 5 minutes.
- To serve, remove tart from tart pan and place on a serving platter. Artfully arrange grilled orange slices over tart and garnish with additional blackberries. Slice and serve.
Drink Pairings
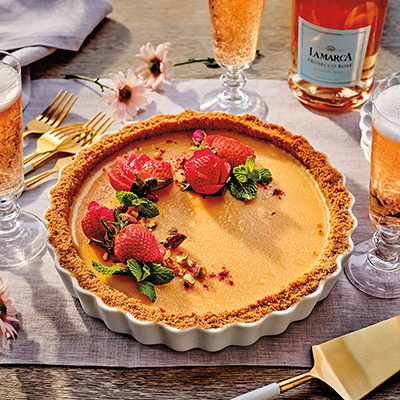
Rhuby-Rose Tart
Impress your guests, and maybe even yourself, with this Rhuby-Rose Tart. This tangy rhubarb curd is cradled in a sweet, crumbly crust with a soft hint of rose, adding an aromatic touch. Decorate as you please and make this recipe your own. Consider pairing this recipe with La Marca Prosecco Rosé or Sheringham Rhubarb Gin Liqueur.Ingredients
Serves 6-8
⅔ cup + ¾ cup (340 ml) butter, divided
2 cups (500 ml) graham cracker crumbs
2 tbsp (30 ml) golden brown sugar or granulated sugar
⅛ tsp (a pinch) salt
4 stalks rhubarb (about 1 lb/450 g), cut into 2-in (5 cm) chunks (fresh or frozen)
1½ tsp (7.5 ml) gelatin crystals
2 tbsp (30 ml) water
3 large eggs
¾ cup (180 ml) granulated sugar
2 tsp (10 ml) rosewater
shelled pistachios, strawberries, freeze-dried strawberries, dried roses and fresh mint leaves, for garnish, as desired
Instructions
- Preheat oven to 350 F (175 C).
- In a small saucepan, melt ⅔ cup (160 ml) butter until it starts to change colour. Remove from heat and allow to cool slightly.
- In a large bowl, combine graham cracker crumbs, sugar, salt and melted butter. Mix well. Pour into a 10-in (25 cm) tart dish or pan. Using back of a round, flat-bottomed measuring cup, push and press mixture evenly along bottom and sides of tart dish or pan.
- Bake for 8 to 10 minutes, until golden brown. Remove from oven and allow to cool completely. Blend rhubarb in a food processer. Strain through a fine-mesh strainer placed over a bowl to separate juice from pulp. Use a spoon to press solids in strainer to extract all juice. Discard solids. This should yield about 1¼ cups (310 ml) rhubarb juice.
- In a small bowl, combine gelatin and water and allow gelatin to bloom for 5 minutes. Set aside.
- In a bowl, using a handheld blender or wire whisk, whisk eggs and sugar until blended and smooth.
- In a medium saucepan, combine 1 cup (250 ml) rhubarb juice, egg mixture and ¾ cup (180 ml) butter. Cook over medium-low heat until butter melts. Stirring regularly to avoid eggs congealing along bottom and sides of saucepan, continue cooking until mixture thickens to consistency of thick yogurt. Remove immediately from heat. If curd is too thick, add remaining rhubarb juice a few tablespoons at a time.
- Add bloomed gelatin and rosewater and mix until gelatin has fully dissolved. Strain through a fine-mesh strainer to remove any lumps.
- Pour into prepared tart shell. Refrigerate overnight or for at least 4 hours to set.
- Garnish as desired with pistachios, strawberries, freeze-dried strawberries, dried roses and mint.
Drink Pairings
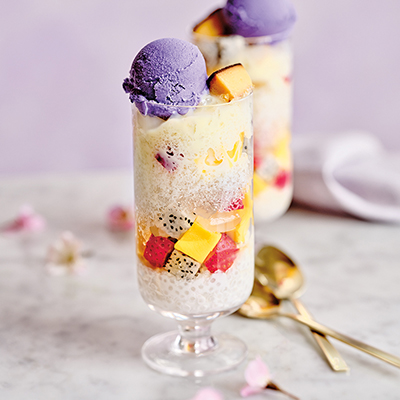
Spirited Halo Halo
Tagalog for “mix-mix,” halo-halo is a traditional Filipino dessert that’s a party in a glass. The icy treat gets its name from a concoction of sweet ingredients in interesting flavours and textures topped with shaved ice and evaporated or condensed milk. If you don’t have a shaved ice maker, you can simply crush ice into a fine powder in your blender. Look for halo-halo ingredients in your local Asian market or online. Pair this recipe with Captain Morgan Mango Mai Tai.Ingredients
Serves 4
½ cup (125 ml) small sago pearls
4 cups (1 L) water
1½ cups (375 ml) unsweetened coconut milk
¼ cup (60 ml) sweetened condensed milk
¼ cup (60 ml) evaporated milk
2 mangoes, peeled, pitted and cut into bite-sized cubes
1 dragon fruit, peeled and cut into bite-sized cubes
1 cup (250 ml) quartered or diced strawberries
⅓ cup (80 ml) drained palm seeds
4 tbsp (60 ml) Don Papa Rum, plus more if desired
4 to 6 cups (1 to 1.5 L) shaved ice
ube ice cream or pandan ice cream
leche flan (purchased), cut into 1-in (2.5 cm) pieces
Instructions
- In a medium saucepan, cook sago pearls in water according to package directions. Drain, then place warm in a medium bowl with coconut milk, stirring well to separate pearls. Set aside and let cool to room temperature. Coconut sago can be made up to this point and stored in an airtight container in refrigerator for up to 2 days. Before serving, warm gently over low heat to bring to room temperature.
- In a small bowl or glass measuring jug, stir condensed milk and evaporated milk. Set aside.
- In 4 tall glasses, layer sago pearls, mango pieces, dragon fruit pieces, strawberries and palm seeds. Feel free to add more or less of any ingredient. Pour at least 1 tbsp (15 ml) Don Papa Rum into each glass. Add shaved ice to fill each glass, taking care to leave some room for toppings. Top ice with 2 tbsp (30 ml) milk mixture before topping everything off with a scoop or two of ice cream and some leche flan. Halo halo is best enjoyed right away.