
Peek-a-BOO!
Garlicky marinated bocconcini, rich salty prosciutto and a splash of Pimiento-Gin Sauce—keep your eyes on these tasty canapés or you might miss out. Serve this appetizer with 19 Crimes Bride Of Frankenstein Red Blend.Ingredients
Serves 20 canapés
BOCCONCINI
2 tbsp (30 ml) extra-virgin olive oil, plus more to cover
1 tbsp (15 ml) minced garlic
1½ tbsp (22.5 ml) white wine vinegar
1 small sprig fresh rosemary
1 tsp (5 ml) salt
1 × 7 oz (200 g) tub cherry bocconcini, halved
10 slices prosciutto, halved lengthwise
10 pimiento-stuffed green olives, halved crosswise
PIMIENTO-GIN SAUCE
3 tbsp (45 ml) diced pimiento peppers, drained
1 tbsp (15 ml) tomato paste
2 tbsp (30 ml) Bombay Sapphire Sunset Gin
1 tbsp (15 ml) balsamic vinegar
1 tsp (5 ml) honey
1 tsp (5 ml) Dijon mustard
½ tsp (2.5 ml) Spanish smoked paprika
¼ cup (60 ml) extra-virgin olive oil
Instructions
- To make the bocconcini, in a medium mixing bowl, combine 2 tbsp (30 ml) olive oil, garlic, vinegar, rosemary and salt. Add bocconcini halves and toss until well coated. Transfer to a jar or airtight container and pour in more olive oil to cover. Seal jar and marinate, refrigerated, for a minimum of 24 hours and up to 3 days.
- Remove bocconcini from marinade and pat dry. Wrap each piece with a half slice of prosciutto and top with a slice of pimiento-stuffed green olive. Leftover marinade can be used to make a vinaigrette, pesto or pasta dish.
- Garnish a serving tray with a splatter of Pimiento-Gin Sauce and arrange wrapped bocconcini as desired.
- To make the pimento-gin sauce, in a blender, combine all ingredients except oil and purée until smooth. While on high speed, slowly drizzle in olive oil until emulsified. Sauce can be made ahead and stored in an airtight container in refrigerator for up to 3 days.
Drink Pairings
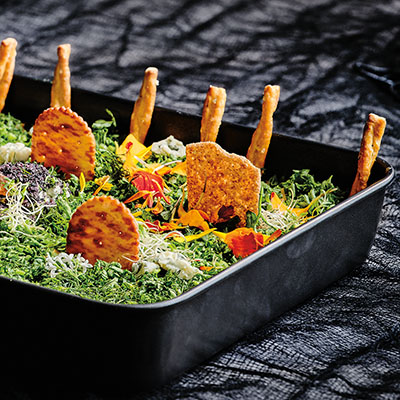
Buffalo Chicken Boneyard
Celery, check. Blue cheese, check. Frank’s RedHot, check. All the notes of party favourite buffalo chicken wings are found in this delightfully spooky Halloween Boneyard dip. Pair this appetizer with Chronic Cellars Sir Real Cabernet Sauvignon or Diablo Dark Red.Ingredients
Serves enough for a horde of partygoers, or 6-8 people
1 × 8 oz (226 g) block cream cheese, room temperature
½ cup (125 ml) ranch dressing
⅓ cup + 2 tbsp (110 ml) Frank’s RedHot sauce
¾ cup (180 ml) sour cream
⅓ cup + 2 tsp (90 ml) buttermilk
1 tsp (5 ml) Spanish smoked paprika
½ tsp (2.5 ml) onion powder
½ tsp (2.5 ml) garlic powder
2 cups (500 ml) shredded cheddar
3 cups (750 ml) diced cooked rotisserie chicken
1 stalk celery, diced small
6 to 8 assorted crackers, for garnish
⅔ cup (160 ml) chopped fresh parsley, for garnish
3 tbsp (45 ml) chopped fresh dill, for garnish
pretzel sticks, for garnish
3 to 4 reserved chicken bones from rotisserie chicken, cleaned and dried, for garnish (optional)
¼ cup (60 ml) crumbled blue corn tortilla chips, for garnish
¼ cup (60 ml) crumbled blue cheese, for garnish (optional)
crackers and sturdy potato chips, to serve
Instructions
- In a medium mixing bowl, combine cream cheese and ranch dressing and beat until smooth. Add Frank’s RedHot, sour cream, buttermilk, paprika, onion powder and garlic powder and mix well. Fold in shredded cheddar, diced chicken and celery until well mixed. Transfer to a 9 × 11-in (23 × 28 cm) serving dish, smooth surface and cool in refrigerator until ready to serve.
- To garnish, arrange a few crackers for headstones and sprinkle surface with chopped parsley and dill. Line outside edge of dish with pretzel sticks for fence posts. Arrange a few chicken bones (optional) in front of a couple of headstones and cover with a small mound of tortilla crumbs. Place a few crumbles of blue cheese (if desired) around headstones. Serve with plenty of crackers and sturdy potato chips.
Drink Pairings

Witch’s Hat Cheeseball
This cheesy party snack is filled to the brim with mild Cambozola, cream cheese and cheddar spiked with port and black garlic. Hats off! Be sure to enjoy this Cheeseball with Parallel 49 Craft Lager.Ingredients
Serves 8-10 people. Makes 1 large and very cheesy witch’s hat and as many broomsticks as needed to get all your witchy guests home safely.
CHEESEBALL
1 cup (250 ml) Taylor Fladgate Vintage Port 2017
1 head black garlic, peeled and chopped, or ½ cup (125 ml) chopped dried figs
12 oz (340 g) cream cheese, room temperature
6 oz (170 g) Cambozola, room temperature
4 oz (110 g) cheddar, shredded
1 tbsp (15 ml) Worcestershire sauce
1 tsp (5 ml) freshly ground black pepper
½ tsp (2.5 ml) onion powder
½ tsp (2.5 ml) garlic powder
1 cup (250 ml) crushed blue corn tortilla chips
radish, very thinly sliced, for garnish
crackers, to serve
BROOMSTICKS
string cheese sticks, cut into 1¼-in (3 cm) long pieces
pretzel sticks
fresh chives, cut into 2½-in (6.25 cm) lengths
Instructions
- To make the cheeseball, in a small saucepan over medium heat, combine port with black garlic and simmer to reduce volume to ½ cup (125 ml). Set aside and let cool to room temperature.
- In a medium mixing bowl, combine cream cheese, Cambozola, cheddar, Worcestershire, pepper, onion powder and garlic powder and beat until smooth. Add cooled port reduction and mix well. Wrap about one-quarter of mixture with plastic wrap and flatten into a small disc. Wrap remaining mixture with plastic wrap and form into a cone shape. Refrigerate for a minimum of 2 hours.
- Cut a piece of parchment into a 7-in (18 cm) circle. Using gloves or a large sheet of plastic wrap, form cheeseball as follows. On cut-out parchment circle, use unwrapped disc portion to form brim of hat. Place unwrapped cone portion on top and shape top part of hat. Coat cheeseball with crushed tortilla chips, then arrange sliced radishes where hat brim and top meet to make a hat band.
- Using parchment disc to help, slide witch’s hat onto a plate. Garnish with Broomsticks and serve with plenty of crackers.
- To make the broomsticks, use a chopstick or wooden skewer to poke a ⅓-in (0.8 cm) deep hole in 1 end of a piece of string cheese. From unpierced end, peel back shreds of cheese, stopping halfway. Insert a pretzel stick ½-in (1.25 cm) into pierced hole and tie with piece of chive. Repeat with remaining string cheese, pretzel sticks and chives.
Drink Pairings
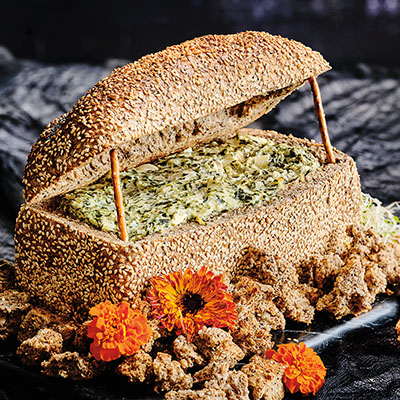
Spinach & Artichoke Dip Crypt
A good hit of Pernod brings an unexpected twist to a timeless party favourite. Bring this to your next Halloween get-together and be the life—or death—of the party. For best flavour, we recommend Pernod Fils. Pair this appetizer with Crow Canyon Sauvignon Blanc.Ingredients
Serves enough for all the ghosts & ghouls, or 6-8 people
1 mini loaf (about 5 × 9-in/12.5 × 23 cm) dense seedy bread or rye bread
10½ oz (300 g) frozen chopped spinach, thawed
2 tbsp (30 ml) extra-virgin olive oil
1 large shallot, finely chopped
3 cloves garlic, minced
1 × 14 oz (398 ml) can quartered artichoke hearts, drained and roughly chopped
¼ cup (60 ml) Pernod Fils
1 × 8 oz (226 g) block cream cheese, room temperature
1 cup (250 ml) sour cream
1 cup (250 ml) shredded mozzarella
¼ cup (60 ml) grated Parmigiano-Reggiano
2 tbsp (30 ml) mayonnaise
salt and freshly ground black pepper, to taste
2 pretzel sticks crackers, to serve
Instructions
- Preheat oven to 350 F (175 C).
- Cut a 1½-in (4 cm) slice from top of bread loaf and set aside. Scoop out inside of bottom part to form a rectangular bread bowl, leaving ½-in (1.25 cm) walls around edges. Tear scooped bread into bite-sized pieces, place them on a baking sheet and lightly toast in oven, about 10 minutes.
- Place spinach in a clean tea towel, roll up and twist ends to remove excess liquid.
- In a medium skillet over medium-high heat, warm olive oil. Add shallots and garlic and sauté until soft and fragrant, about 2 minutes. Add spinach and artichokes and mix well, then add Pernod and reduce by half. Cool slightly.
- In a medium mixing bowl, combine cream cheese, sour cream, mozzarella, Parmigiano-Reggiano and mayonnaise and beat until smooth. Add spinach-artichoke mixture and mix until well incorporated. Season with salt and pepper to taste.
- Spoon mixture into bread bowl and transfer to a parchment-lined baking sheet along with top slice. Bake until dip is warmed through and lightly browned on surface, about 25 minutes, removing top slice after 10 minutes.
- Place top slice on bread bowl and prop it open with pretzel sticks. Serve dip with toasted torn bread pieces and plenty of crackers.
Drink Pairings
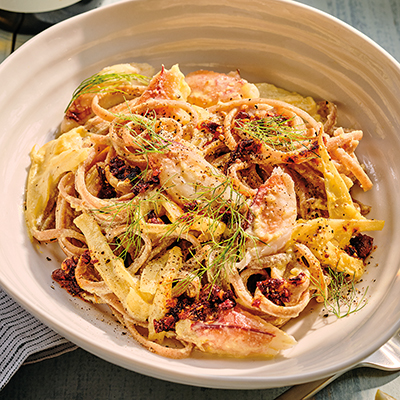
Spelt Noodle Crab Pasta
This fresh spelt noodle crab pasta recipe highlights the delicate sweetness of BC crabmeat in every bite, complemented by the creamy richness of ricotta cheese and the aromatic flavor of fennel. This dish pairs wonderfully with CedarCreek Pinot Gris or Steamworks Lions Gate Lager, making it a versatile choice for wine or beer enthusiasts alike.Ingredients
Serves 4
¼ tsp (1 ml) ground saffron
2 ice cubes
7 oz (200 g) ricotta cheese
2 to 4 tbsp (30 to 60 ml) olive oil, divided
1 lb (450 g) spelt linguine
1 large bulb fennel, trimmed, fronds reserved for garnish
kosher salt and black pepper, to taste
3 cloves garlic, minced
1 large lemon, zest and juice
1 lb (450 g) Dungeness crabmeat and claw meat, picked over and any shells discarded
homemade or store-bought hot chili oil, for garnish
* Saffron is usually available in strands. Use a small mortar and pestle to grind it into a fine powder, or just finely crush it between your fingers.
Instructions
- Place saffron in a small bowl or jar. Add ice cubes and let sit at room temperature until ice is fully melted, about 20 minutes.
- Meanwhile, place ricotta in a blender, add 1 tbsp (15 ml) olive oil (or up to 2 tbsp/30 ml if ricotta is dry) and blend until smooth, scraping down sides of blender with a rubber spatula as needed. Transfer whipped ricotta to a small bowl and set aside.
- Bring a large saucepan of water to a boil. Add a couple good pinches of salt and cook pasta until al dente according to package directions.
- Meanwhile, in a large frying pan or sauté pan over medium-high heat, heat 1 to 2 tbsp (15 to 30 ml) olive oil. Finely slice fennel bulb before adding to pan. Season fennel with salt and pepper and sauté, stirring often, until wilted and softened with a bit of colour, 8 to 10 minutes. Add garlic and bloomed saffron and continue to sauté until fragrant, about 2 minutes. Turn off heat and stir in lemon zest and juice.
- Once pasta is cooked, remove and reserve 1 cup (250 ml) cooking water before draining pasta in a colander. Stir pasta into fennel mixture. Stir in ricotta and thin as desired with reserved pasta water to make a creamy, emulsified sauce. Fold in three-quarters of the crabmeat.
- Divide pasta among warm serving bowls. Garnish with remaining crabmeat, some torn fennel fronds and a drizzle of chili oil. Enjoy.
Drink Pairings
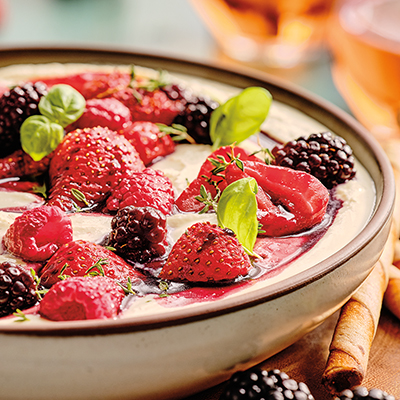
Whipped Feta with Red-Wine Grilled Mixed Berries
This fun, dippable whipped feta red-wine dessert is a great choice when wanting to serve something to linger over at the end of a meal. Serve with an array of fruit, cookies or grilled brioche, allowing diners to choose their own sweet adventure. Pair with Dirty Laundry Hush Rosé.Ingredients
Serves 4
10 oz (280 g) feta, crumbled
⅓ cup (80 ml) plain Greek yogurt
1 tbsp (15 ml) extra-virgin olive oil
4 tbsp (60 ml) liquid clover honey, divided
½ tsp (2.5 ml) ground cardamom
1 lb (450 g) mixed red berries (such as strawberries, raspberries, blackberries or cherries), halved if large
3 tbsp (45 ml) See Ya Later Ranch Poppy Red
fresh thyme leaves, mint leaves and/or basil leaves, for garnish
selection of fruit, cookies or grilled brioche, to serve
Instructions
- Preheat barbecue grill to medium-high.
- Meanwhile, make whipped feta. In bowl of a food processor fitted with an S blade, combine feta, yogurt, olive oil, 2 tbsp (30 ml) honey and cardamom. Blend until smooth and creamy, scraping down sides of bowl with a rubber spatula as needed. Transfer to a bowl and refrigerate until ready to serve.
- In a medium bowl, gently toss mixed berries, red wine and remaining 2 tbsp
- (30 ml) honey. Stack 2 layers of heavy-duty foil on top of each other and fold up sides slightly. Add berry mixture and bring up edges to create an open parcel. Alternatively, you could use an ovenproof frying pan. Place over flames, reduce heat to medium and grill for 10 to 15 minutes, taking care to stir every few minutes. Berries should be softened and starting to release their juices. If not, continue to grill for another 5 to 10 minutes.
- To assemble, spread whipped feta onto a dinner plate or into a shallow bowl. Spoon warm berries over whipped feta. Garnish with a drizzle of berry juices and a sprinkling of herbs. Serve alongside fruit, cookies or brioche for dipping.
Drink Pairings

Limoncello Blueberry Tiramisu with Candied Rosemary
Once summer arrives, the desire to spend time in the kitchen tends to wane and we look for fresh recipes that can be whipped up in a jiffy. This limoncello blueberry tiramisu is perfect for such an occasion. With just a few ingredients, you will have a dessert with next to no effort yet packed with flavour. Feel free to shake things up by replacing the blueberries with strawberries, raspberries or blackberries, or even the ladyfingers with amaretti cookies. The Candied Rosemary is optional but takes this dessert from simply delicious to stunning. This dessert pairs beautifully with Steller's Jay Brut.Ingredients
Serves 4
13 oz (370 g) fresh blueberries, plus more for garnish
½ cup + 2 tbsp (155 ml) icing sugar, divided
3 tbsp (45 ml) fresh lemon juice, divided
1 tbsp (15 ml) finely grated lemon zest
¼ cup (60 ml) granulated sugar
¼ cup + 2 tbsp (90 ml) Luxardo Limoncello, divided
⅔ cup (160 ml) whipping cream
1 tbsp (15 ml) powdered milk (optional)
⅓ lb (150 g) mascarpone
4 ladyfingers, each cut in half
Candied Rosemary leaves, for garnish, make ahead, recipe follows
Instructions
- Start by making a blueberry coulis. In a small saucepan, stir blueberries, ½ cup (125 ml) icing sugar and 1 tbsp (15 ml) lemon juice. Set over medium heat and bring to a simmer, stirring often. Simmer until blueberries have broken down and mixture is glossy, about 5 minutes. Transfer blueberry coulis to a bowl and refrigerate, stirring occasionally, until cool. Blueberry coulis can be made up to 2 days ahead.
- In a small saucepan, stir remaining 2 tbsp (30 ml) lemon juice, lemon zest and granulated sugar. Set saucepan over medium heat and warm mixture, stirring constantly, until sugar has dissolved. Remove saucepan from heat and stir in ¼ cup (60 ml) limoncello. Transfer lemon syrup to a medium bowl and set aside to cool to room temperature. Lemon syrup can be made ahead and kept in an airtight container in refrigerator for up to 3 days.
- In a medium bowl, whisk whipping cream and powdered milk (if using) until stiff peaks form. Set aside.
- In bowl of a stand mixer fitted with whisk attachment, combine mascarpone, remaining 2 tbsp (30 ml) icing sugar and remaining 2 tbsp (30 ml) limoncello. Whisk on medium speed until well combined and slightly aerated, about 2 minutes. Fold in whipped cream with a rubber spatula until incorporated completely.
- To assemble, place a generous spoonful of blueberry coulis in bottom of each of 4 serving glasses. Top with a good dollop of lemon mascarpone cream before dipping half the ladyfingers in lemon syrup and placing on top of cream. Repeat, creating another layer with more blueberry coulis, mascarpone cream and syrup-dipped ladyfingers. Garnish with another dollop of mascarpone cream, a drizzle of coulis, some fresh blueberries and Candied Rosemary leaves.
Drink Pairings
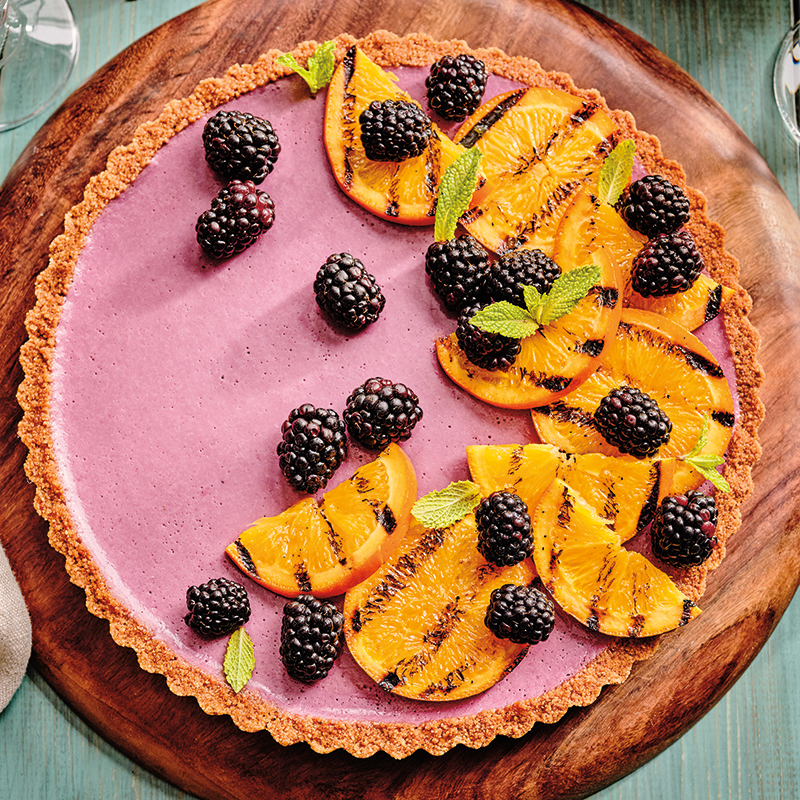
Blackberry Tart with Grilled Grand Marnier Oranges
This brilliantly coloured blackberry tart with Grand Marnier oranges makes the perfect finale to any summertime meal. You can swap out the blackberries for raspberries for an equally delicious result. Try pairing this recipe with Saintly The Good Sparkling Rosé.Ingredients
Serves 10
1 cup (250 ml) unsalted butter, divided
2 cups (500 ml) gingersnap cookie crumbs
¼ tsp (1 ml) fine salt
¼ cup (60 ml) water, room temperature
2½ tsp (12.5 ml) powdered gelatin
3 cups (750 ml) blackberries, plus more for garnish
¾ cup (180 ml) whole milk
½ cup (125 ml) granulated sugar
½ cup (125 ml) whipping cream
1 tsp (5 ml) vanilla extract
¼ cup (60 ml) light brown sugar
2 tbsp (30 ml) Grand Marnier Cordon Rouge
2 navel oranges, ends trimmed off and each cut into 8 rounds
Instructions
- Preheat oven to 350 F (175 C).
- In a small saucepan over medium heat, melt ½ cup (125 ml) butter. Cook, stirring occasionally, until butter stops foaming and solids start to turn golden brown, 8 to 10 minutes. Transfer butter to a medium bowl and set aside to cool slightly.
- In a medium bowl, stir gingersnap cookie crumbs, salt and ⅓ cup (80 ml) browned, melted butter until well combined and mixture sticks together in a clump when pressed between fingers. Press crust mixture into a 9-in (23 cm) fluted tart pan, pressing mixture evenly into bottom and up sides. Refrigerate tart shell for 10 minutes. Save any remaining browned butter for another use; it will keep in an airtight container in refrigerator for up to 2 weeks.
- Place chilled tart shell on a rimmed baking sheet and bake until firm, 12 to 14 minutes. Set aside on a rack to cool completely at room temperature.
- To make blackberry filling, start by placing water in a small bowl and sprinkling gelatin evenly overtop. Let bloom for 5 minutes.
- Meanwhile, place blackberries in bowl of a food processor fitted with an S blade. Blend until blackberries are well puréed. Strain mixture through a fine-mesh strainer into a bowl and discard seeds. You should have about 1 cup (250 ml) purée.
- In a medium saucepan over medium heat, bring milk and sugar to a simmer, stirring often. Remove from heat and stir in bloomed gelatin until it melts. Transfer warm milk mixture to a blender along with blackberry purée, whipping cream and vanilla. Blend on low until well combined. Transfer mixture to a container with a pour spout. Carefully pour blackberry mixture into crust, filling it to top. Transfer tart to refrigerator until custard is set, at least 1 hour.
- Preheat barbecue grill to medium, taking care to clean and oil grills.
- In a small saucepan, combine remaining ½ cup (125 ml) butter, brown sugar and Grand Marnier. Warm gently over medium heat, whisking constantly, until butter melts and sugar dissolves. Remove from heat.
- Place orange slices on grill and baste with butter mixture. Grill until grill marks form on underside, about 1 minute, then flip and baste again. Continue to grill until warm but not falling apart. Transfer to a platter and baste one last time. Let cool for 5 minutes.
- To serve, remove tart from tart pan and place on a serving platter. Artfully arrange grilled orange slices over tart and garnish with additional blackberries. Slice and serve.
Drink Pairings
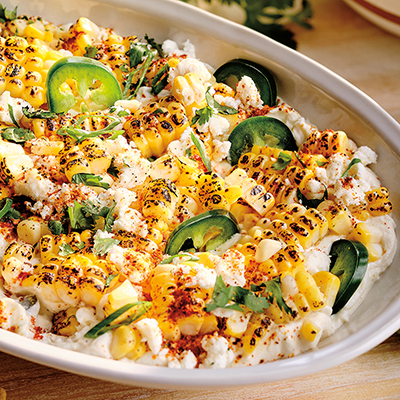
Mexican Street Corn Dip
From Chilliwack to Chiapas, nothing says summer like fresh corn. Take this Mexican vacay inspired dip to your next backyard BBQ and it’ll be a guaranteed crowd pleaser. Offer Ole Cocktail Tequila Variety Pack or Modelo Especial beer for a great drink pairing.Ingredients
Serves a fiesta-sized bowl
BASE LAYER
12 oz (340 g) cream cheese, room temperature
¾ cup (180 ml) sour cream
⅓ cup (80 ml) mayonnaise
1½ tbsp (22.5 ml) pickled jalapeño juice, from jar
2½ tsp (12.5 ml) garlic powder
1½ tsp (7.5 ml) onion powder
1 lime, zest only
½ cup (125 ml) sliced green onions, green parts only
⅓ cup (80 ml) pickled jalapeño peppers, chopped
MEXICAN STREET CORN
2 cobs corn (peaches and cream or any variety of sweet corn)
1 lime, juice only
2 tsp (10 ml) nutritional yeast
½ tsp (2.5 ml) garlic powder
½ tsp (2.5 ml) onion powder
½ tsp (2.5 ml) chili powder
¼ tsp (1 ml) salt
sliced jalapeño pepper, for garnish (optional)
¼ cup (60 ml) chopped fresh cilantro
½ cup (125 ml) crumbled queso fresco, feta or cotija cheese
½ tsp (2.5 ml) Tajín seasoning (or to taste)
Instructions
- To make Base Layer, in a medium mixing bowl, combine cream cheese, sour cream, mayonnaise, pickled jalapeño juice, garlic powder, onion powder and lime zest and beat until smooth. Stir in green onions and pickled jalapeños, then transfer to a serving bowl and refrigerate until cooled.
- To make Mexican Street Corn, preheat barbecue grill to medium-high.
- Grill corn until lightly charred on all sides. Let cool, then remove kernels from cobs and toss in a bowl with lime juice, nutritional yeast, garlic powder, onion powder, chili powder and salt.
- Arrange seasoned corn mixture onto chilled base layer and top with jalapeño slices (if desired), cilantro, queso fresco and Tajín seasoning.
Drink Pairings

Tangy Herbed Potato Salad
Ready for spring, this recipe offers a healthier take on the classic Potato salad. It’s a crowd-pleasing, tangy, herbed fresh salad that delivers uncompromising comfort on any menu, from a family feast to a patio party. Try pairing this recipe with Saintly The Good Sauvignon Blanc.Ingredients
Serves 6 to 8
1 ½ cups (375 ml) plain Greek yogurt
2 tbsp (30 ml) extra-virgin olive oil
2 tsp (10 ml) Dijon mustard
⅛ tsp (a pinch) cayenne pepper
1 tbsp (15 ml) apple cider vinegar
½ cup (125 ml) chopped fresh chives
¼ cup (60 ml) chopped green onions
2 tbsp (30 ml) chopped fresh parsley, plus more for garnish
2 lbs (900 g) Yukon Gold potatoes
salt and pepper, to taste
2 stalks celery, finely chopped
3 tbsp (45 ml) chopped fresh mint, plus more for garnish
Instructions
- In a large non-reactive bowl, combine yogurt, oil, mustard, cayenne, vinegar, chives, green onions and parsley. Cover and refrigerate overnight or for at least 1 hour.
- Place potatoes in a large pot of salted water and bring to a boil over high heat. Reduce heat to medium and cook until tender when pierced with a fork, 10 to 15 minutes. Drain and let potatoes cool slightly.
- Carefully cut potatoes in halves or quarters (about 1½‑in/4 cm chunks), depending on size of each potato. Place on a large baking sheet and season with salt and pepper. Cool completely.
- Add yogurt dressing to potatoes, along with celery and mint. Mix until combined. Garnish with parsley and mint and serve.